Whether you’re concerned about the lack of control over your data, invasive advertising or digital surveillance, there are many reasons to shake off big tech services. This is a series of tutorials to help you get Google out of your private life and make it easier for your friends and family to do so as well. There are free and paid, open source, and private alternatives for almost every digital service. You may need to put in a bit of effort, but we promise you: you, your loved ones, and our society will be better off.
Your correspondence and agenda should be private!
No one but yourself should have access to your contacts and your appointments, except the people you choose to share these singular details with. Google and other “cloud” actors have offered us convenience at the cost of ruining our privacy. But free, open source, and private solutions exist for contact and calendar syncing, even across multiple devices. This tutorial will explain how to secure your contacts and your appointments from loss while maintaining your privacy. You shouldn’t be stuck with a Google account merely for fear of losing data!
Step 1: Export your contacts and calendar from Google /Apple
Exporting contacts from Google:
When a Google account is connected to a device, Google spies on who you know, when you contact them, and when you meet new people. This “social graph” is very valuable data to be resold to third parties. But you can reclaim control of this data. The first step is to get a copy: go to contacts.google.com and select the export button.
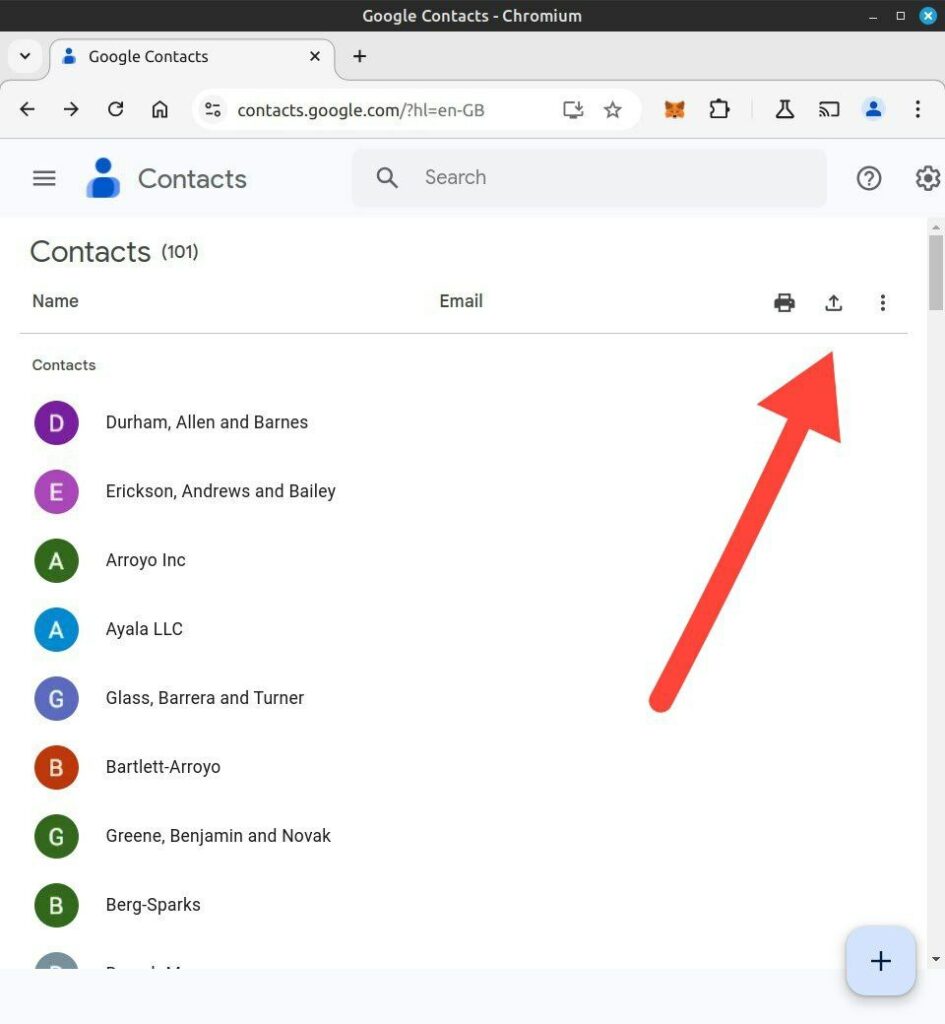
This will download a file with all your contacts. Save it as a vCard file.
Then, you can export your agenda and appointments from Google, by going to calendar.google.com. On the left, your calendars should be listed in the interface. Hover over the calendar you want to export and click on the tree dots that appear. Click Calendar Settings. From there, you can click the Export calendar button, which will export all your appointments, past, present and future, to a zip file.
Exporting contacts and calendar from Apple / iOS:
Apple provides this guide for exporting contacts from iCloud. Calendar export is only partially supported from iCloud.
Congratulations! You’ve got a copy of your contacts and your calendar!
Step 2: Choose a solution for backup & sync
Mail providers with built-in contacts and calendar
We previously spoke of some of the email alternatives to big tech, such as Proton, Tuta, Posteo or Mailbox. Many of these providers already have calendar and contact integration. If you already have a mail provider, check with them how to import your calendars and contacts and if they have their own mobile tools for syncing them.
Nextcloud
Thousands of individuals and companies use the open-source Nextcloud hosting to sync their contacts and calendar across devices, and keep their data safe from the prying eyes of Big Tech. You can host it yourself if you have a server, for best control of your information and privacy. Or you can choose a free provider. If you go this second route, keep in mind that the sysadmins of that service will have access to this data, so only choose a trustworthy provider. Nextcloud is many other things aside from a calendar and contacts server – it’s also an alternative to Google Drive and Google Docs, but for the purposes of this tutorial, we’ll just focus on calendars and contacts. Even the smallest free account will be more than enough to store contacts and calendars and sync them across all of your devices. The first step is to choose a Nextcloud provider or host it yourself. If you already have an account, proceed to the davx5 section below.
Free Nextclouds you can sign up for:
- nextcloud.com/sign-up/
This will redirect you to a Nextcloud provider near you. - tab.digital/
They offer free accounts of up to 8 GB - disroot.org/
Another Nextcloud provider
These free services are provided as examples. Paid Nextclouds will give you much more space if you want to use the cloud storage, and better upload and download speeds. Here you can find many more Nextcloud providers: goodcloud, s7a.it, zaclys, pathconnect.de, owndrive, nch.pl, hosting.de, cloudamo, alfacloud, librebit, librecloud, stackhero.
Import your contacts
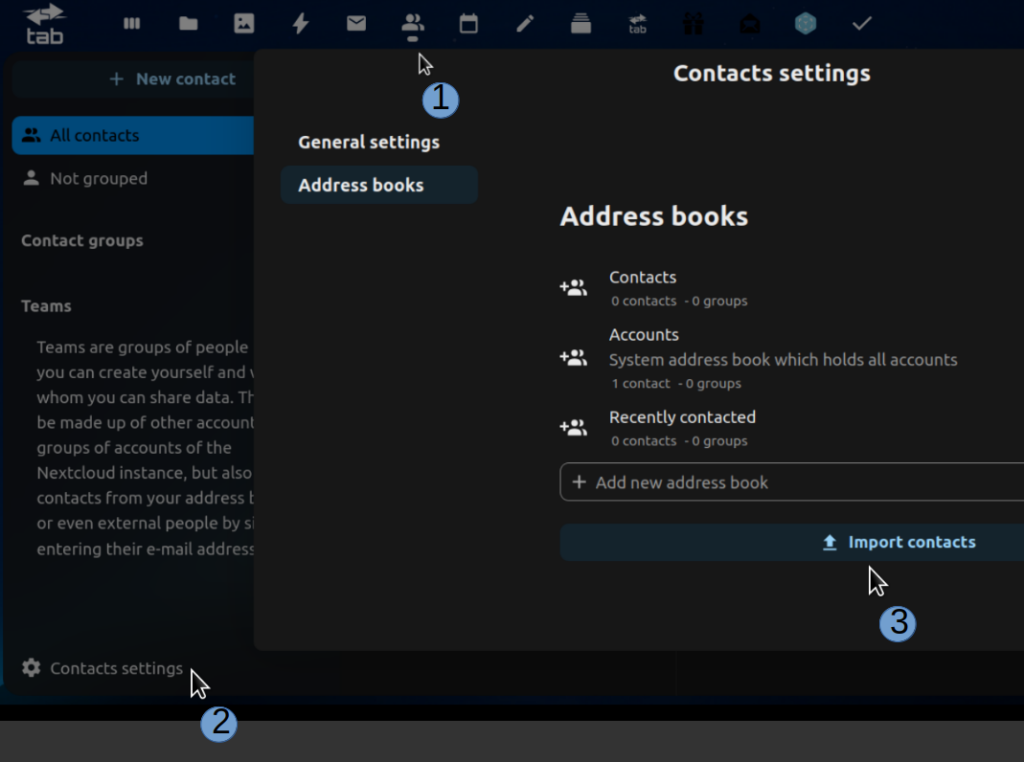
To import your contacts in your Nextcloud instance, log in and click in the top menu on Contacts. Click the settings in the bottom left corner and press it. Click Import Contact and select Select local file. Now open the vCard file you downloaded earlier, and Nextcloud will take care of the rest.
Import your calendar
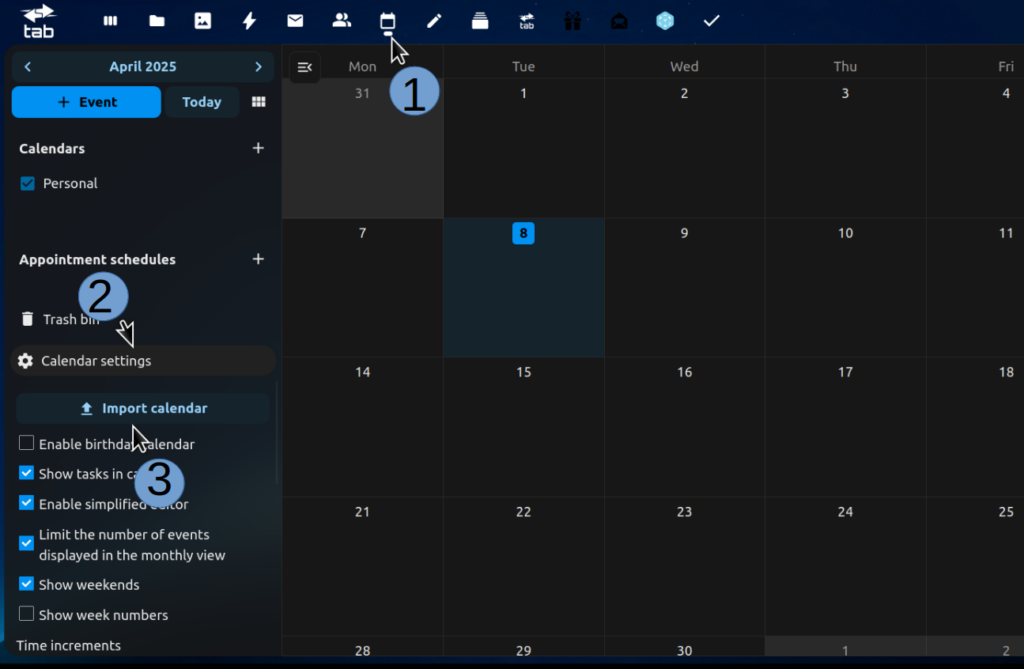
When you unpack the downloaded zip file, there will be one or more ics files, one for each calendar. These can be imported into Nextcloud. In your Nextcloud dashboard, click on Calendar. Then in the bottom left corner, click Settings & import and click on Import calendar. Now open your just-downloaded ics files, and Nextcloud will import all your appointments. It can take a few minutes.
Use DAVx⁵ to integrate into the operating system
While you can consult your Nextcloud using a web browser, integration of the contacts and calendar into the mobile operating system requires another piece of software like DAVx⁵ or davDroid. You can download DAVx⁵ from Google Play, or alternatives like F-droid or the Aurora store.
It will ask you about tasks. If you don’t need task support, you can ignore this feature. Next, you will need to give DAVx⁵ permissions to contacts, calendars, and notifications. The last is just to let you know if syncing your contacts and calendar fails for some reason.
Next, choose regular sync intervals. This will allow DAVx⁵ to run in the background.
And finally, you will need to add your Nextcloud credentials. Choose Add account and provider-specific login (Nextcloud). Use the URL for your Nextcloud. It should be something like cloud.YOUR_PROVIDER.com, which will take you to a browser session where you can connect the account to your device.
Login, and you’re done! Now you can sync contacts and calendars across devices and keep your data safe from loss and private from data brokers!
What about your mobile device?
Even before installing any apps or accounts on your device, the stock Android (or iOS) operating system already starts profiling your behavior, sending data back to Google’s (or Apple’s) servers. One big step you can do with your mobile device is to degoogle it entirely. Many devices can be degoogled with a custom operating system, offering improvements in performance, security, privacy, and sustainability.
Be smarter than your phone!
At iodé, we are specialized in developing private and secure software for mobile devices. If you’d like to buy a device with iodéOS preinstalled, please visit our shop! These sales help pay for the development of the software. That said, you can also DIY install: iodéOS is open source, available for installation on 50+ devices.
We are passionate about helping people regain control over their technology, and we offer this set of tutorials to help people overcome their dependency on big tech.
Next: Degoogle your private life #3 – Maps and Navigation
Articles about degoogling
- DeGoogle Your Private Life #1 – Mail
- DeGoogle Your Private Life #2 – Contacts and Calendar
- DeGoogle Your Private Life #3 – Maps and Navigation
- DeGoogle Your Private Life #4 – Real time messaging
- DeGoogle Your Private Life #5 – Private Web Browsing
- How to degoogle your Android phone
- How to watch YouTube without being tracked
- The Best YouTube Alternatives